Boom...Morgan
Showing posts with label DIY. Show all posts
Showing posts with label DIY. Show all posts
Thursday, February 23, 2017


Friday, May 13, 2016
Fly Product...Mountain Creek Anglers' Wall Mounted Bottle Opener


To see more of Mountain Creek Angler's beautiful work or to order your very own bottle opener for $24.95, check them out at http://www.theflyfishingmall.com. Be sure to check them out on Instagram as well for their latest work.
Boom...Morgan
Thursday, May 12, 2016
Monday, January 4, 2016
DIY...Repair Your Rod Handles This Winter
Got Cabin Fever? If so, tying flies and researching/reading on how your going to have an epic 2016 in fishing gets tiring after awhile. I always take time to clean reels, lines, and rods to get them shiny and ready for the new year, but I never thought about refurbishing the handles. I know what I'll be doing the next couple of months! Check it via the Mud Hole Blog...

Boom...Morgan

For many fishermen, these winter months mean no fishing. That is, unless you live in Florida like Mud Hole, or you have caught the ice fishing bug.
In any case, it is still a good time of year to take a look at your fishing rods, and do any maintenance necessary so when it is time to go fishing; you know all your equipment is ready to go.
This article highlights some common best practices for maintaining or repairing your EVA and cork fishing rod handles and grips.
Continue reading by clicking here...
Monday, December 14, 2015
Gina & Gasoline - Line Marking Shorthand
Ive used this system for years, something Lefty taught me while I was in college. Check it...

and read the rest of the article by heading over to Gink & Gasoline.
Boom...Morgan

and read the rest of the article by heading over to Gink & Gasoline.
Boom...Morgan
Saturday, May 16, 2015
Kickstarter...The Reel Winder
"The Reel
Winder" hit Kickstarter is ready for support, especially with only 8 days to go. As soon as it hit
the site, the backers starts to pledge, showing anticipation was high for this
product.
With a review on the horizon from these guys, I
can tell you already this product is worth the backing (no pun intended).
For $40 ($25 for Early Bird Special), your going to get a phenomenal
product PLUS an extra spool. I've spooled two reels so far with this and its
twice as fast as my DIY Line
Spooling Station, which I thought was efficient. L&R Solutions
hit the nail on the head with this product, and I think you'll find the same
once you have one in hand. Head on over to the Kickstarter
now to get yours, the rewards for this
campaign, not to mention the quality and use of this product, are
definitely worth the support.
Did
I mention its Made in the USA... 'Merica!
Via L&R Solutions:
Never buy an extra fly reel spool again using
“The Reel Winder”

L & R Solutions has created “The Reel Winder” an innovative fly fishing tool that will eliminate the need to ever buy an extra fly reel spool again. The Winder attaches to your fly rod handle to quickly “Reel” fly line off your fly reel then, by exchanging winder spools, you are able to “Reel” on a different line.

“THE REEL WINDER” ATTACHED TO A FLY ROD
Monday, May 4, 2015
Friday, February 20, 2015
Flashback Friday...DIY Reel Spooling Station
I've decided to start a new segment called "Flashback Friday", after the popular Hashtag. It will highlight one of our top past posts from all segments. This one is my all-time favorite and in the top 5 of "Most Viewed" posts in TLTFF history...enjoy.

I asked Santa for a line winder or reel spooling station for Christmas but I guess it fell out of the back of his sleigh en route to my place. So I went on a search for a well-priced, well-made one and the cheapest one I found that fit this criteria was about $24.99. I know thats not too much but I knew I could make one cheaper.
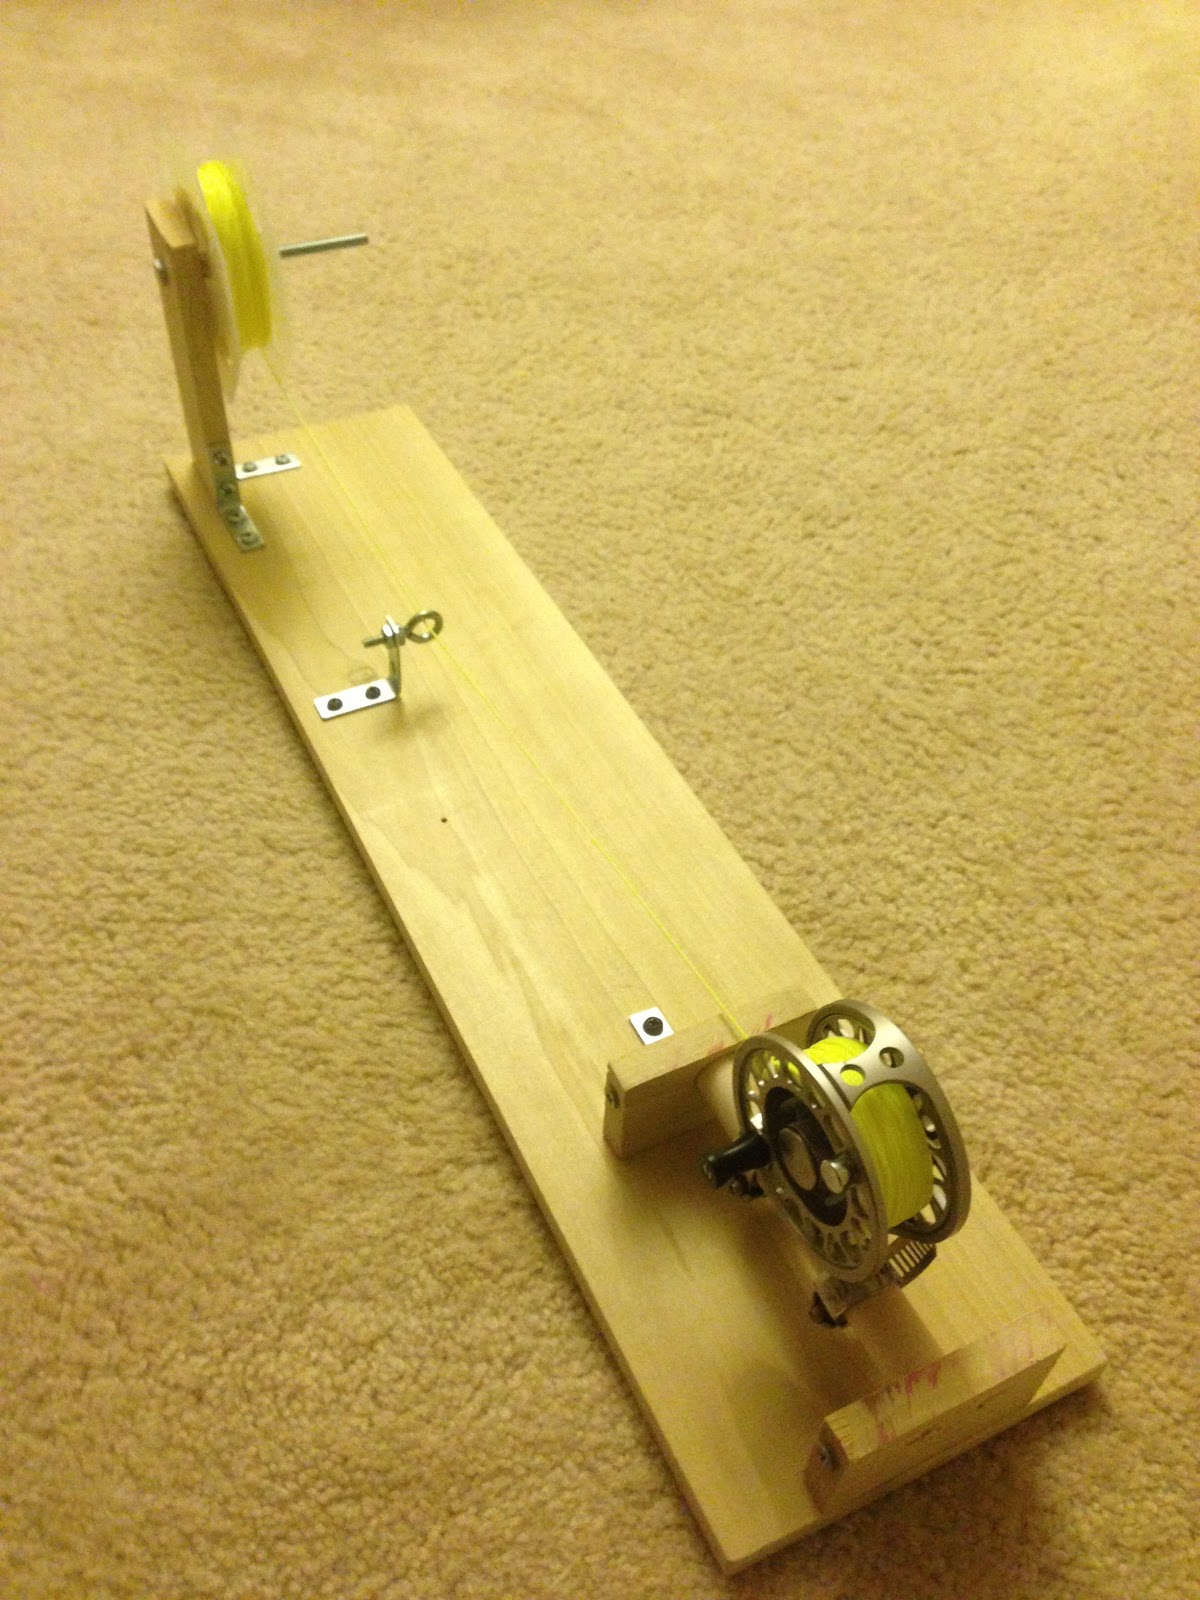
I busted out the old graph paper and drew up a few ideas before I finally decided to just head over to Home Depot and kill some time cruising the isles and finding what I thought I needed. Well after and hour in home depot and $14.94 spent, I had what I wanted and headed home. The project overall took me about an hour and half but was pretty fun to make.
So without further adieu, this is how I made my own spooling station for under $15 and how you can too...
Materials List:
- 1 30" x 6" board of wood (I cut a board I bought down to these dimensions)
- 1 3/16" x 1-1/2" Eye Bolt
- 2 Matching Nuts for Eye Bolt based on thread count (should come with eye bolt)
- 1 4" long 1/4" - 20 Hex Bolt
- 1 1/4" - 20 Nylon Lock Nut
- 1 1/4" - 20 Wing Nut
- 1 1/4" Washer
- 4 1-1/2" Corner Brackets
- 14 Small 1/4" Long Screws (any will do, they are to secure the brackets)
- 2 1" Pipe Couplings
- 6 2" Drywall Screws
- Box of Felt Furniture Feet (optional)
- 6" of 3/4" Wood Dowel
- Hammer
- Drill
- 3/4" Drill Bit
- 1/4" Drill Bit
- Screwdriver
- Tape Measure
Click below for instructions!
Click below for instructions!
Friday, April 18, 2014
How To Tie the Turd Burglar Crab Fly
Back in March, at Lefty Kreh's Tie Fest, I had the privilege of meeting Ken Dorward of Hooked Up™. Hooked Up™ is owned and operated by Uncommon Content, a progressive content creation, development and production company. Uncommon Content produces both fiction and non-fiction content to be distributed primarily across the web via youtube, television and other multi-media platforms. Inspired by our sister channel, Reserve Channel, Hooked Up™ is dedicated to bringing you the best of all things fishing.
Ken sat and watched me tie up a few flies and decided to get one on film, my Turd Burglar Crab. Before I could blink, I was mic'd up and had two cameras in my face. Not only was this my first show, but first time on film with a legit company. I was stoked, but shaking like a leaf. Ken and crew were awesome, they calmed my nerves and did a phenomenal job editing the video. We're looking forward to working more with Hooked Up in the future as the content they provide is 100% applicable to any angler.
A big thank you goes out to the Hooked Up crew! Without further adieu, here is the Turd Burglar Crab fly tutorial.
Boom...Morgan
Saturday, April 12, 2014
Tuesday, April 1, 2014
DIY...Fly Fish Food's Spool Minder "Fly Hack"
Such a legit and affordable DIY "hack"...so simple. Those boys at Fly Fish Food always bring some amazing content...check it...


Boom...Morgan

Here's another one of those "ah ha!" type tips on how to store and manage your spools of wire, tinsel, floss, v-rib or anything else that comes on a spool. And yes, it involves a trip to the Craft Store....
I'm pretty sure once you create and use a few of these little doo-dads, you won't go back to the free-wheeling spools like you might have done in the past.
The video explains it nicely below, but all you need are some 1/4" or 6 to 7mm craft beads, some 1/4" elastic and some super glue. I usually make a "template" piece of elastic and cut a bunch of them at once using this piece to measure against. Then you just glue and let them dry. Easy as can be...
I'm pretty sure once you create and use a few of these little doo-dads, you won't go back to the free-wheeling spools like you might have done in the past.
The video explains it nicely below, but all you need are some 1/4" or 6 to 7mm craft beads, some 1/4" elastic and some super glue. I usually make a "template" piece of elastic and cut a bunch of them at once using this piece to measure against. Then you just glue and let them dry. Easy as can be...

Check out more "Fly Hack's" by clicking here...be sure you give the Fly Fish Food crew some love on Instagram and Facebook too!
Boom...Morgan
Saturday, November 9, 2013
Northeast on the Fly

A new forum popped up just before we started Carp Week that caught our eye. Its calledNortheast on the Fly and has a focus on fly fishing the Northeast. Its slowly becoming the epicenter for everything fly fishing in the Northeast from reports to gear to tutorials and fly tying. It is helping bring fly fisherman together and giving them a central medium for talking fly. We've been talking to founders Mike Percelli and Scott Caras (co-founder ofCheeky Fly Fishing) and are stoked to have the opportunity to not only contribute toNortheast on the Fly, but also moderate and help this great new forum grow. Here's a little something the guys from NE on the Fly sent us...
"The forum was created on the premise of "how do we get more people involved in discussing the sport". With the help of Scott Caras, we put up the board and figured what the hell. Figuring it would help Scott and some other companies get a little exposure as well. We didn’t want to get larger companies involved as they already have a strong presence. We wanted the little guy. WE also figured that with a good community, maybe we can all learn a thing or two from each other. Plus I love to network and both Scott and I wanted a way to meet new people and possibly fish with them. My biggest problem with fly fishing is I don’t have anybody to really fish with me on a consistent basis. So that’s one of my hopes. In addition to that, I am filled with more useless info then you can imagine about this sport. Im hoping with everyone helping each other, the forum community grows and enjoys talking about the sport."
Signing up is free and easy, it takes about 5 minutes from when you sign up to get your confirmation email and have your first post live. The forum has threads for each state, includes an area to buy and sell gear, and we've even added a DIY section to help the frugal angler do his own thing for next to nothing. Roll on over to Northeast on the Fly, even if your not located in the NE and learn a thing or two about fly fishing in our neck of the woods.
Boom...Morgan
Monday, August 19, 2013
Northeast on the Fly
A new forum popped up just before we started Carp Week that caught our eye. Its called Northeast on the Fly and has a focus on fly fishing the Northeast. Its slowly becoming the epicenter for everything fly fishing in the Northeast from reports to gear to tutorials and fly tying. It is helping bring fly fisherman together and giving them a central medium for talking fly. We've been talking to founders Mike Percelli and Scott Caras (co-founder of Cheeky Fly Fishing) and are stoked to have the opportunity to not only contribute to Northeast on the Fly, but also moderate and help this great new forum grow. Here's a little something the guys from NE on the Fly sent us...
"The forum was created on the premise of "how do we get more people involved in discussing the sport". With the help of Scott Caras, we put up the board and figured what the hell. Figuring it would help Scott and some other companies get a little exposure as well. We didn’t want to get larger companies involved as they already have a strong presence. We wanted the little guy. WE also figured that with a good community, maybe we can all learn a thing or two from each other. Plus I love to network and both Scott and I wanted a way to meet new people and possibly fish with them. My biggest problem with fly fishing is I don’t have anybody to really fish with me on a consistent basis. So that’s one of my hopes. In addition to that, I am filled with more useless info then you can imagine about this sport. Im hoping with everyone helping each other, the forum community grows and enjoys talking about the sport."
Signing up is free and easy, it takes about 5 minutes from when you sign up to get your confirmation email and have your first post live. The forum has threads for each state, includes an area to buy and sell gear, and we've even added a DIY section to help the frugal angler do his own thing for next to nothing. Roll on over to Northeast on the Fly, even if your not located in the NE and learn a thing or two about fly fishing in our neck of the woods.
Boom...Morgan
Saturday, May 25, 2013
DIY GoPro Cable Cam (Pulley) Mount

On a trip earlier this year, I happened to notice two really cool trees on either end of the stretch of stream I was fishing. I thought about how cool it would be to get an overhead shot of me fishing this long, straight stretch from a bird eye view. So I got to thinking about how to do so and I came up with the idea to string up a length of rope between the two and send a pulley contraption with my GoPro on it down the stretch. Thats ultimately, how I arrived at our newest DIY...The GoPro Cable Cam (Pulley) Mount.
Here's the parts list:

- 1 - 8" metal bracket
- 4 - 2" metal brackets
- 2 - Awning pulleys
- 1 - 4" corner bracket ( I know two are shown but only 1 was used, they come in two packs)
- 1 - 2" length 1/4"-20 screw
- 3 - 1/4"-20 nuts and washers
- 2 - 1/2" corner brackets (pictured below)
- 2 - Key rings (pictured below)
- 2 - 1/4" length 1/4"-20 screws (not pictured)
- String or paracord
- Wrench
- Drill
- 30 minutes of your time

Start off by putting your 1" screw through a hole drilled in the direct center of your long 8" bracket.


Put one of your corner brackets onto the back part of your screw and fasten it on with you washer and nut (pictured above).


Take your 1/2" corner brackets and awning pulleys and fit the welded end of the pulley into your corner bracket (you may have to drill out a larger hole).


Lock in the awning pulleys with your key rings. These can also be used to hang counter balances from.


Attach a GoPro adhesive mount to the large corner bracket (you can also use a tripod screw if you don't have adhesive mounts and have the GoPro Tripod Mount). Balance out your pulley mount on some string while the GoPro is attached and add counterweight to level it out. I used a 4 oz pyramid sinker attached to 50lb test mono at first (pictured above) but moved on eventually to something that looked a little better.

String up your mount with one end of the string/cord lower than the other so the mount will travel down the mount. I used sting in the picture above and had a roll of mono as my counterweight just to demo what it looks like in the air. I have used the mount once and it worked great. You just have to make sure you use sting/cord thats wide enough for the pulley. I am trying to find a low power motor now to help with a smoother ride along the cord to help pull the mount along.
Now I think this mount cost me about $20, which isn't too bad for the shot it can produce to make your video that much cooler! If you have any questions, hit us up via email, Twitter or on our Facebook page.
Boom...Morgan
Boom...Morgan
Wednesday, May 15, 2013
Fly Product: Review of Risen Fly's Ichthus Reels

A couple of months ago I saw a random Tweet from some no name company about a $12.50 fly line. Of course, being a frugal guy, I decided to check out the link and see what this Risen Fly company was all about and why they were offering lines so cheap. Clicking that link and heading over to RisenFly.com was the catalyst to a chain reaction of fly line purchases and the start of a great relationship.
Saturday, April 20, 2013
Thursday, April 11, 2013
Sunday, April 7, 2013
DIY...Build Your Own Magicicada Sensor!

Magicicada Brood II will make its 17-year appearance when the ground 8" down is a steady 64° F. Help predict the arrival by planting a homemade temperature sensor in the ground and reporting your findings back to to Radiolab. We'll put them on a map and share your observations with the world.
The whole detector costs about $80 in parts and takes about 2 hours to build. You'll want it in the ground by mid-April, the earliest the cicadas are likely to emerge.
For more information on how to build your own sensor and for step-by-step instructions, roll on over to Radiolab's Cicada Sensor page and check it out for yourself. Its actually a project I'm thinking about taking up!
Boom...Morgan
Friday, March 1, 2013
DIY...GoPro Handy Cam Mount
Since most of us here at TLTFF have a GoPro and are always looking for new ways to get some new shots, we have decided to start focusing about 50% of our DIY projects on new ways to utilize our GoPro's. So here is a little something I came up with on one of my days off that not only took less than 15 minutes and costs under $5.
Parts List:


And stay tuned for next our next GoPro DIY, the GoPro (Pulley) Cable Cam Mount...

Boom...Morgan
Parts List:
- GoPro Flat Adhesive Mount
- 4" Metal Corner Bracket
- 2' Paracord
Its really as easy as 1...2...3. Basically, take your corner bracket and wrap your paracord over it a good 20-25 times. Put the ends of your paracord through the holes in the bracket and slip them through the end wraps and tights down the wraps. Burn the ends of the paracord so they cant slip back out from under the wraps. Place your adhesive mount on the other end of the bracket and voila...GoPro Handy Cam Mount! Enjoy!


And stay tuned for next our next GoPro DIY, the GoPro (Pulley) Cable Cam Mount...

Boom...Morgan
Wednesday, January 30, 2013
DIY...Rotary Fly Dryer
In an attempt to bring more content to our DIY section of the blog (tab above), I've decided to start featuring one DIY project every two or so weeks (if feasible). In order to do so, we need requests for what you want us to make! You can check out the DIY tab above for more info.

Our latest project is for those of you who still appreciate good ol' head cement, epoxy, or super glue for tying flies and don't have the time to watch your flies back or head dry as you turn it or move it in an attempt to get an even dry. I have had a fly dryer on my Bass Pro wish list for month but have never decided it a good time to throw down $55 for it. So I set out on a quest to make a fly dryer for under $20, over half of the cost of the BPS Rotary Fly Dryer...
I started out with a basic idea of what I wanted based off of a few Google image searches and came up with this...click below to read on a for full instructions.

Our latest project is for those of you who still appreciate good ol' head cement, epoxy, or super glue for tying flies and don't have the time to watch your flies back or head dry as you turn it or move it in an attempt to get an even dry. I have had a fly dryer on my Bass Pro wish list for month but have never decided it a good time to throw down $55 for it. So I set out on a quest to make a fly dryer for under $20, over half of the cost of the BPS Rotary Fly Dryer...
I started out with a basic idea of what I wanted based off of a few Google image searches and came up with this...click below to read on a for full instructions.
Subscribe to:
Posts (Atom)